Friday, August 30, 2013

Embellishments Galore

Good morning Bloglanders

I hope you are well. It is very, very cold and wet in Sunny SA and I feel like heading straight back to bed BUT places to go, people to see and things to do.  Today I've got some eye candy to show.

When I buy something, I try to use it to save on something else. Here is what I made to save on embellishments for my projects:


I've used my Silhouette to "cut and print" the images and background. As I'm new to Sihouetteland I stumbled upon the "offset" button by chance.  This is the most wonderful function!!! It outlines your image and you can even choose how big the outline must be.  Here you can see how I did a fuzzy cut around images by using the "offset" button. Just remember to "no cut" the initial image!


I do like the little bit of white around my images - just makes them pop. Next week I'll show you how I did the Kitty Cats - I've done them from a stamp (not so DUMMY anymore!) and they actually cut much nicer on the offset line.

Back to my dimensional embellishments.  For my background image I moved the "offset outline", filled it with color and did the "print and cut" again. In between the two layers I've got pop dots to give the needed dimension.  I do get super excited when I think about everything I can do with this!

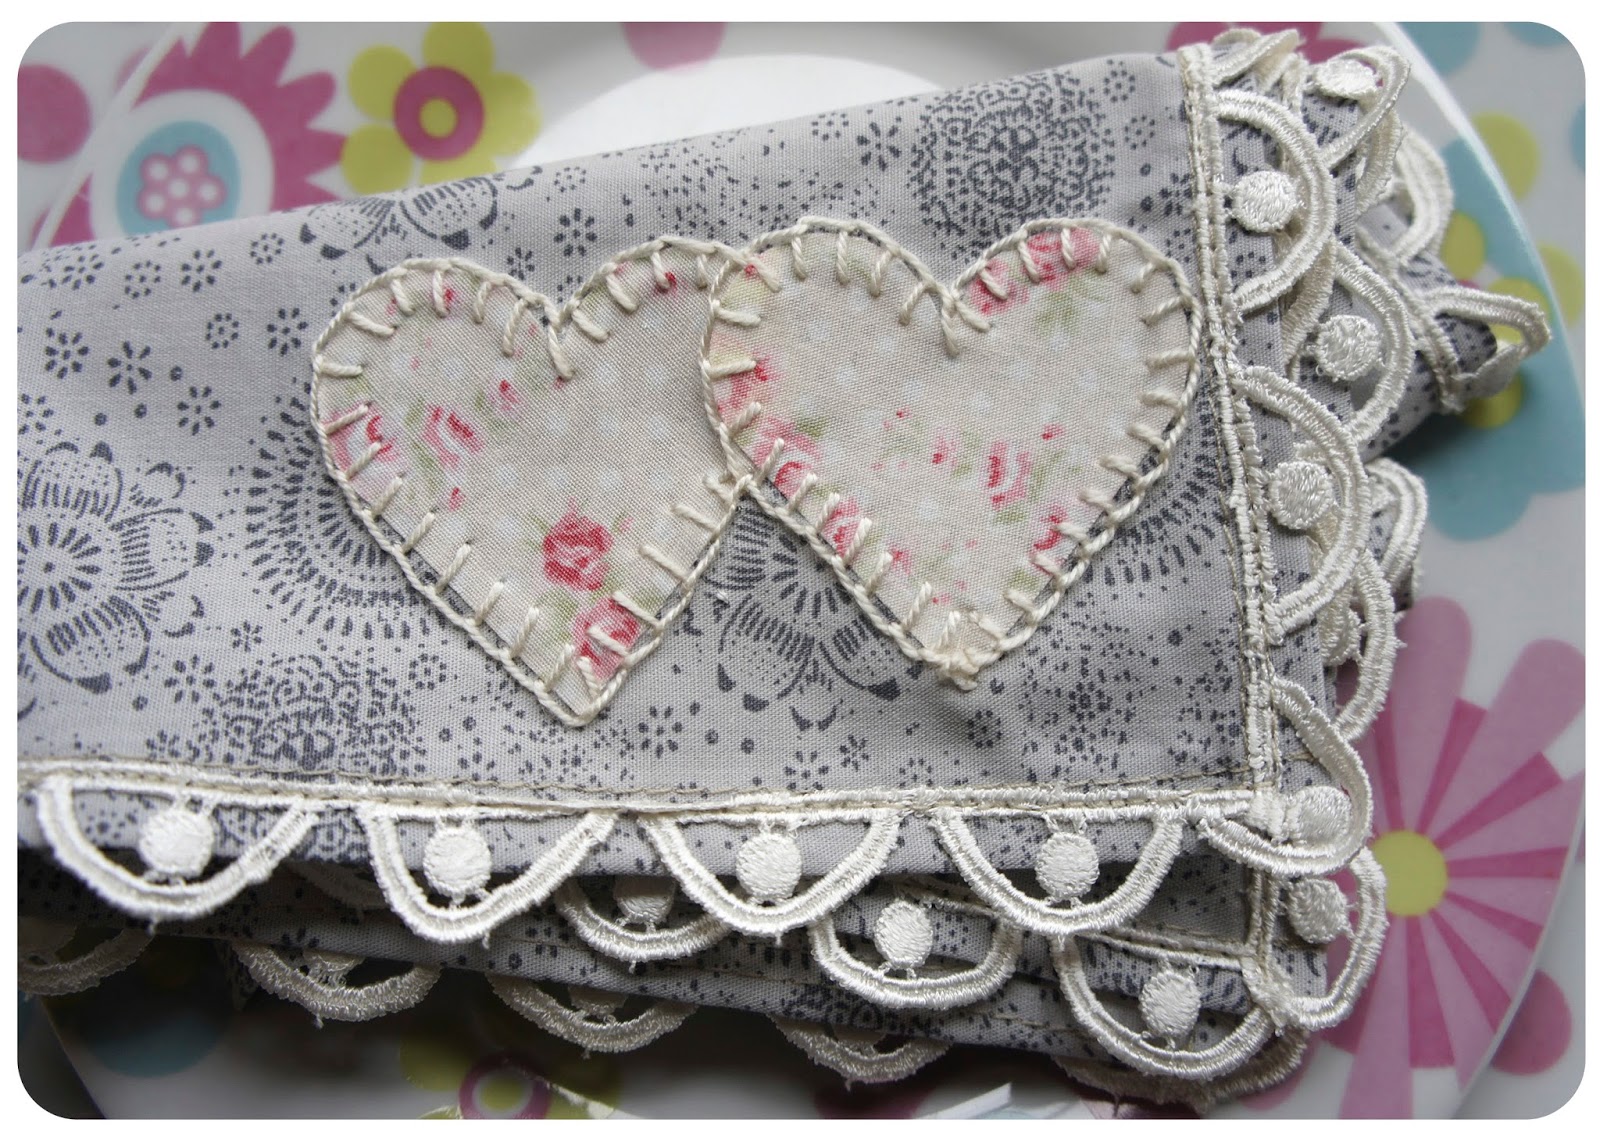
Here you can see a close-up of the sewing machine:


And, as always I packed some to give away:

That's it. Super easy, affordable dimensional embellishments!  I'm off to meet the people, see the places and do the "things".  Thanks for looking at my blog today.  I'm having a super, dooper blog month - all thanks to you.  If you need more info on how I did my DUMMY projects - let me know in the comments and I'll gladly help.

Have a great weekend and please come back to play.

Hazel


Wednesday, August 28, 2013

Playing games

Hallo Bloglanders

I hope you are having a Wacky Wednesday!!  It is very, very wet and cold in Sunny SA and I love every minute of it - boots, scarves, soup and lots and lots of fluffy blankets.  Do you still remember that I went on a loooooooooong holiday a while back?  I always make lists and one of the things on my "to do list" is to make some games to play in the car.

We used to have some when Pieter was little and still traveling with us but I can't even remember what happened to them.  So, I decided to do my very own.  Yes, they will be originals - given as pressies to family and friends. (and those grandchildren I'm going to have!!)

I'm here to show my first attempt:
It will work like "I spy with my little eye" - this one will be for numbers.  If you see a sign with a number first, you can put those circles on your board. Each player will have a board and numbers 1-9. Like "1-stop-shop". You can use the "1". First one with a full board wins and if only one plays - when your board is full, you get a treat! Makes me want to travel.

How did I do it?  I used my silhouette to "print and cut" and this time I didn't use any graphics except the font.  I did all the squares and circles on my own and even filled them with ice cream colors of my choice. Just shows that you don't need to buy a lot of cutting files - even a dummy like me got the hang of it.

Everything was printed on Silhouette magnetic sheets and cut.  This will make it perfect for travelling as the numbers stick to the boards.  And this is how they are stored:

I repurposed an old tin. What makes it great is that all the magnetic elements stick to the metal tin. When I add more games to my range, I'll punch holes and keep them together with a binder ring. Everything can fit into the tin and stay in the seat cover pockets of our car.

I'm off to do another game.  Thanks for playing with me.  Please check back as I have lots and lots more to share with you right here.  Have a great day!

Hazel

Tuesday, August 27, 2013

Layout with MME

Good morning Bloglanders

First of all - I've had the best blogging month since I started about 2 years ago. Thank you very much for all your support.  I really enjoy blogging about my crafty life and my blog motivates me to try out new things, to think up alternative ways to be creative and the best part - I get to finish about 5 projects each week!!

Now for my layout:
I started with Project Life last year and it's really intimidating BUT I'm slowly but surely getting the hang of things.  I don't do a page a week.  Too conventional for me. When I have pictures, I add them and at the end of the month - I go through my monthly file and add whatever I missed. (mostly the iPhone or iPad ones) I love layouts - I include at least 2 every month and I do mini layouts as fillers for my PL pockets. If you missed it and want to look, just click here.

Back to my layout.  I used 95% MME papers - some very old and some more recent.  The "other" 5% are recycled paper - the craft from a parcel I received and the cream from an old notebook. (one I actually used when I went to university - see the hole - 100% authentic) I used this sketch from MME as inspiration:


100% MME embellishments and the die cuts were done with old MME papers. I totally love that speech bubble with the heart. Here is a close-up:

And I totally forgot about my journaling - had to add a tag.  Bottom right you can see what I did it.

Now for the story. Wynand, Pieter and I have our birthdays within a fortnight. Each year I make a layout where I tell what we did on each occasion. This year we went "wedding venture hunting" and the pics in my layout is of  THE ONE.

Back to my papers.  I stumbled upon an old kit with papers from the Life Stories range - never heard of it before!  For the background I added woodgrain from Miss Caroline and the flowery paper is from Find your wings and Fly. I don't think I would ever have used this specific print but against all the muted colors - I LOVE it. Let me tell you a secret.  All these papers (except the woodgrain) were in my "use or lose" pile and I'm totally chuffed with myself for saving them.

Thanks for looking at my blog today.  Have a Terrific Tuesday and please come back to play.

Hazel


Sunday, August 25, 2013

Back to School (or maybe not!)

Good morning Bloglanders

It is a beautiful, sunny, Sunday morning in Stellenbosch and I thought I'd show you what I did yesterday. Wynand went away on business and I had the whole day to spend on my own. This is what I made:


The idea of an art kit has been at the back of my mind for some time. Wynand and I went to a luxury lodge in the Cederberge a while ago and in each room they had a mini art kit.  I totally loved the idea and thought I would make one for my guest room. Just love the idea of my visitors having fun while being artistic.  I just couldn't decide how it should look like as I didn't want to buy a leather version like the lodge (much too expensive and un-creative for IMPERFECT ME). Then I saw this:


I love Twine from The Twinery and I love challenges BUT I don't have any children at school so I decided to make the challenge work for me. (and I'll show how you can easily adapt it for school).  Here is the one for my art supplies:
And the adapted version for pens, pencils and a notebook:
For those of you who want to make one - this is what I did:

Cut two rectangular pieces of fabric - I have laid everything out on my table and measured around it. Remember to leave some extra space for a "spine" for your folder if you want to add bulky supplies.

Cut one piece of iron-on batting slightly smaller than your cover pieces.

For the pocket I used the cover piece as a template - just added about a third to the width and subtracted about a quarter of the height.

Iron the batting to one of your cover pieces.

Fold over the top edge of the pocket piece. Sew in place.

Stitch the pocket piece to the outside of the cover piece (the one with the batting on). I did add a little pleat to one of the pockets - easy!  Insert the paint set and pin in place - then stitch. In my picture you can see it in my middle pocket. Cut the excess fabric from the pocket piece off (if you have any).

For the front I worked lines of twine over the whole piece - you can do whatever you want - I just liked the artsy, colorful look.

Now sandwich everything together.  Right sides to the outside.

Stitch around the whole thing - about 1 cm from the edge.

Trim the edges to about half a cm.

Zig-zag around the edges. I use a big zigzag and go around twice.

Actually, the folder is done now but I wanted to add more color (and twine, of course!). Blanket stitch all around to cover the zig-zags.

For a closure I added 2 buttons to the front and some multi colored twine to wrap around my folder.

A close-up:

This would make great gifts and to take along while traveling - the options are endless.  While everything is out, I think I'll do some more for my pressie stash.

That's it - 2 inspirations covered in one project!  I'm off for a walk in the park, a "braai" (barbeque for my non SA Bloglanders) and glass of wine on my "stoep" (porch).  Thank you for looking at my blog and please check back as I have a lot more to share right here.  Have a Sunny Sunday!

Hazel


Thursday, August 22, 2013

Vintage Napkins with my Silhouette

Good morning Bloglanders

I hope you are well.  I've been sorting through my fabric stash and you wouldn't believe how many scraps I have.  The plan is to convert them all into usable objects and at this stage of my life I don't think I have the energy to do a quilt so I'm opting for smaller projects. First up: Napkins.


I have sorted everything into stacks that goes together. Like this:


My vintage stack. You will see that not everything is "vintagy" but I think the overall effect will be.  I'll be "mix and matching" them to get a set of about 6 napkins. For the first one I used two fabric hearts that I've cut with my Silhouette and stitched with embroidery thread ex my grandmother - she died more than 20 years ago!! The fabric cutting was easy - I used a 6x4 piece of fabric adhered to the Silhouette mat and even though I thought HETTE might eat my fabric, everything went without a hitch. Can't believe how easy it was.

And the finished product:


I'll be doing some extra napkin sets as this would make great gifts and I might even sell some in my Etsy shop. That's it from me. I'm off to have some pictures printed for my PL album.  Thanks for visiting my blog today and please come back to play as I have lots more to share.

Have a great day!
Hazel


Wednesday, August 21, 2013

Viewfinder

Good morning Bloglanders

Here I am in my last year of being 21 (Hie hie hie!!!) - it was time for me to make a few resolutions for the new year.

If I buy something - I'm going to use it!!! My fave examples is magazines - if I buy one, I find something that I can use - inspiration, a recipe, a pattern - anything!! When I do, I write it on the cover of the magazine - this way I know exactly which ones gives me value for money.  And if there is nothing on the cover - I stop buying that one. I'll apply the same principle to my craft stash from now on.

I still had some shop credit left on my Silhouette account and as I wanted to try out the "no cut" option, I bought a retro viewfinder cutting file.  You can hop over to the Silhouette blog and have a look at the original post. Just click here. This is what my version looks like:
And IMPERFECT ME decided that I'm good enough to alter the template. First of all I copied the template with the cut-outs and inserted the pictures of my cat - 14 of them.  Then I did the "no cut" option and moved the outline cut line back over my back piece.  (not sure about the words in this sentence but I think you will understand what I mean) The front stayed exactly as it is as I didn't want to print on it - I wanted some dimension on my title and added it afterwords with thick die cut letters.  Then I did "print and cut".  As easy as that.

Here you can see my work in progress:
My front disc is on top of my PL page protector - with a brad keeping all the layers intact.
And filed away in my PL album with the rest of my 2013 memories:
This would be great to use on a card as well - I'm off to try my hand at a mini version for a 5 year old's birthday. Thanks for looking at my blog and please come back as I have lots more to share with you. Have a Wacky Wednesday.

Hazel

Tuesday, August 20, 2013

Cutting Cookies

Hallo Bloglanders

NO!!! Not with my new Silhouette!!  I hope you are well and today we will skip back to one of my previous posts. Remember this one? Here is the link is you want to check back.


They are my family's firm fave and I love to bake them at any occasion.  Don't they look festive to you?  I always use the same recipe but since girlfriend #1, the Princess is wheat intolerant, I adapted the recipe and it tastes even better. 

This is a very old South African recipe. It was named after General Hertzog who was the prime minister from 1924 to 1939. My original recipe came from Annette Human's "Huisgenoot Wenresepte 2" but please, .......... don't blame her, I did adapt mine!

Want to make them yourself?  Here is my adapted recipe.

For the Dough:
250 g of  Flour (I use a shop bought gluten free pre mix)
25 g of Castor Sugar
10 ml Baking powder
1 ml Salt
125 g of Butter / Margarine (room temperature)
3 Egg yolks (extra large eggs; keep the whites for the filling)

I blend everything together in my food processor.
Add 30 ml ice water and pulse until it starts to form a ball. 
Put the dough in a plastic bag and leave to rest for about an hour. 

Roll out the dough (about 3 mm).
Cut into 8cm circles and put into cupcake tins (the flatter ones)
Use the scraps, form into a ball and roll out again - it works fine for me.
Add half a teaspoon of apricot jam to each and then put in the freezer until the filling is done.

For the Topping:
6 Egg whites (use the 3 left from the dough)
500 g Sugar
320 g Desiccated Coconut

Beat the egg whites until stiff. (like meringue) 
Add the sugar gradually.
Add the Coconut and mix.

Just spread your topping (it's sort of like a coconut meringue) over your dough and jam. I use about a tablespoon per cookie as I love lots of it.
Make sure the jam doesn't peek out - push the topping to the dough with your finger otherwise the jam will cook out.

Now bake for 20-25 minutes at 180˚C (350˚F).
Leave to cool in the pans.
Take out and ENJOY!

With 3 family birthdays within half a month, I'm baking my 3rd batch today.

OH!!! Before I forget - I get 48 cookies from the recipe.

I'm off to the kitchen. Thanks for looking at my blog today - I'll probably take some more pictures and add them to my post.  If you would like to have a look, please check back.

Have a great day!
Hazel


Monday, August 19, 2013

Finally!! Text that I can show.

Hallo Bloglanders

I hope you had a wonderful weekend.  I went wedding venue hunting with my daughter in law to be. We found the most beautiful one on a farm outside Stellenbosch. Very, very vintage. She loves it and so do I. When I have some pictures, I'll share with you.

I told you that I bought HETTE to print titles as we don't get nice ones in Afrikaans.  Up till not I have not been very satisfied but over the weekend I did one that I'm proud of - it is for my monthly "here and now" page as part of my PL album.

Sorry, I did block out some of the personal info - I don't mind sharing with you but my children are rather fussy about their personal lives. Back to my title.  I used two fonts and welded the letters together to get a "hello Augustus" (= August) title. I don't know where I got the fonts but I totally love them. If any of you know, leave me a comment and I'll give credit. I also figured out how to upload fonts to my Silhouette software without adding it to my computer.  Easy as well. Really, compared to Photoshop, Silhouette Software is a walk in the park.

Talking about the park - It is a beautiful Spring day in Sunny SA and I'm off for a walk in the park (for real). Thanks for visiting my blog. Please come back to play as I have lots more to share with you right here. Have a Marvellous Monday!

Hazel


Friday, August 16, 2013

Back to my Bug???? (or NOT???)

Hi there Bloglanders

I can't believe that this week has come and gone.  I've spent some time getting to know my new Silhouette but as I have bags of scraps, my Cuttlebug and shape punches is out to cut some useful shapes and reduce the scrap pile. This is the one thing I don't like about the Silhouette - maybe I just haven't figured it out yet but I try not to cut cardstock smaller than 6x4. And as promised, I want to show you that if you are a "bugger" or even cut by hand, you can still try my projects.

And to proof my point - here I've used the same idea - triple butterflies with HETTE (click here if you missed it) on the left and ones done with my BUG on the right.

What I did like about the Silhouette is that I could alter the size of my butterfly with the click of a button.  With a die cut, you first have to get hold of the die and if you want different sizes it will cost a pretty penny. Also, I think I'll do 100 with the Silhouette in the time it would have taken me to do 10 by hand. So far HETTE has been worth every penny I  spent on her.

And back to this beauty. She is flying away this evening on a birthday card.  I just love the flowers - making a wintry day in Sunny SA pop.


Last but not least. My waterfall card have been mentioned over at the Silhouette blog!!  I'm sorry to be so chuffed but I AM!!!! Hop over there and check it out for yourself. Just click here. If you missed my post on the waterfall card for my PL album, just click here.

That's it from me. I'm looking at wedding venues for my son's upcoming wedding this weekend. Have to run because I still want to make a notebook for myself (and one for the bride-to-be) to make sure that we don't miss out on anything.  

Thanks for looking at my blog today. Please come back as I would love to share my crafting fun with you. Have a great weekend!


Wednesday, August 14, 2013

Love Twine


Hi there Bloglanders

Yes, me and HETTE .................. again!!! Sorry about that and this one I could have done with my Bug but I did want to try my hand at "print and cut" with the Silhouette.  So, here it is:

I'm submitting it for The Twinery's challenge:

The idea is to get inspired by a Pin ex Pinterest and to create with twine by adapting the idea.  My original idea came from this picture:
                                                         

This one is for a Washi party. Every guest brings what she has, you supply the little paper / transparency spools and you exchange!! How easy and pretty can it be??? This would make perfect hostess gifts / party favors as well.

I decided to do all my spools on one sheet of 6x4 photo paper to save on paper, printing and cutting.- I used a tutorial from Christine Newman at WCS to do the "print and cut".  I can't believe how easy it is.  

For those of you who do the Bugs, I have a die from Die-namics (Sew Nifty) that would work just as well. Easy Peasy.

I'm off to try the transparency version!  Thanks for visiting my blog today and please come back to play.

Tuesday, August 13, 2013

Silhouette for a dummy - Waterfall card

Good morning Bloglanders

OK, I said I would keep HETTE for Fridays but I couldn't wait to share my project.  Yes, it's a digital cut of sorts but it went into my PL album and I wanted to share the layout before I forget.

I told you I "invested" in a digital cutter because I'm fed up using English titles and journaling cards as I'm actually Afrikaans.  Surprise, Surprise!!  First one that I did was English!!  I wanted to make a "Summer bucket list" title card for my PL page and so the Afrikaans "SOMER" with the English "bucket list" didn't work for me and I couldn't find a similar word in Afrikaans.

Here is my title card:
As my whole layout was a bit flat, I wanted to add some texture to my page with the title card.  Also, I had a lot of pictures that wasn't included in my page - this waterfall card proved to be the perfect solution. I got the tutorial here and it worked like a charm except for my little holes that vanished every time I "welded". For those of you that are new to electronic cutting (like dummy me) - it is not welding with iron or steel - it is when you group artwork together with a cutting edge around all of them.  My first attempt at making a title was very unsuccessful as I didn't know this, everything fell apart. Note to other dummies: If you start out, this is the first thing you should lean - WELD.

HETTE and I had a bit of a lovers tiff over the title - it wasn't cut as perfect as I wanted it.  I used some older MME paper and it's not that sturdy so maybe that was it.  Have a look here:

The "2", "3" and the "e". Maybe the paper manufacturers can put the cut settings on their papers???????? All and all I would give myself  80% for the finished project and about 20% for the title. Some you win, some you lose.

Here you can see how the card flips up with my bucket list written on the top flap and another pic at the bottom.

And the waterfall in action:

And here is my PL page:
OH!!! I nearly forgot to mention - I got a $10 gift card with my Silhouette - it's great to buy a few goodies to get you going.  Also, on the blog is some great freebies and they have a weekly bundle at a discounted rate. Well worth checking out. Just click here.

That's it from me. Thanks for visiting my blog today. Have a great day and please come back to play.


Monday, August 12, 2013

Meet my new Baby.

Good morning Bloglanders

I hope you had a wonderful weekend and that you are rested and ready for the new week.  As promised - my new baby: HETTE!!


OK, this is a rather long story or maybe I should say this has been coming for a long time. I always said I'll never go digital in die cutting.  Why?? I mostly use scraps for die cutting (and always will) so I'll be a Bugger forever BUT ........................... I totally hate doing alphabets and we don't get nice alphabet stickers down in Sunny SA.

For some time now, I've felt the need to print and cut as all our scrapbook stuff is in English and I'm Afrikaans - I like my titles and journaling prompts to be in my home language.  As easy as that.  I still think I'm wasting paper with the Silhouette but I'm working on that one by die cutting the leftover pieces with my Cuttlebug (as always) and as HETTE cuts are perfectly every time - the negatives are great to use on projects as well. For more than a month, HETTE has been sitting in her box on my desk - I just couldn't gather the courage to start. Last week I finally unpacked her, connected everything and was ready to go.

I've decided to get all my training for free online.  It works but mostly it is video's and if you're new to the Silhouette, a bit fast.  I would like a short, printable tutorial with every video so that you can recap if you get stuck or have to check back. I'm a hard copy and notebook kind of person - IMPERFECT ME!

Another thing that I didn't know - when you buy shapes from the Silhouette online store, it appears like magic in your Silhouette program.  This was a HUGE problem as I use a different computer for my scrapbooking - not connected to the Internet as I try to keep the programs on him to the minimum.  This makes running Photoshop much quicker.  First problem - I have to move the Silhouette software to my "business" computer.  Still not comfortable with that one but for the time being I'll just use free shapes and ones that I do myself. I do have to mention that the software is wonderful - much easier that Photoshop - I nearly committed suicide learning PS!

For those of you who are like me and not sure if Silhouette is the one for you, I have decided to do a HETTE FOR DUMMIES once a week.  I'll try to share with you where I got my shapes, what tutorial I used and maybe, if possible, I will try to do an alternative cutting method.  Then you can see for yourself.

For now, I'm chuffed with my B-Day pressie. Let's make it a date - every Friday I'll do my HETTE post - this will keep me motivated to keep trying and give you a sneak peak into Silhouetting.

That's it from me for today. Have a great week and please come back to play. Later today you can check at Craft Storage Ideas as I'll be over there with a GREAT craft room. Just click here. Thanks for looking at my blog and please come back to play.


Thursday, August 8, 2013

Working on my Stash

Hallo Bloglanders

I'm still playing but decided that I will have to start thinking about Xmas pressies It's nearly spring in Sunny SA and I still have to sort through a lot of stuff.  Once a year I sit down and cut ALL my scraps into pages for mini books or die cuts to be used or redistributed.

Next week, I'll do a week of working with scraps - I'll explain exactly what I do and show some pic's.  Not today as I have something much more colorful to start with:

Once again, I only used scraps from other projects.  I gathered 3 die cut butterflies of the same size, stitched them together and added a pop dot to the back.

Here you can see that I did 3 different sizes:

Not easy to see, but they are on transparency sheets (from recycled packaging material) - this makes it easier to pack in my mini gift wrapping sets.  Remember them?


If you missed them, just click here.  These were amongst my 2012 Christmas presents and I have had a lot of requests for refills so I thought I'd do something different this year for my mini wrapping sets.  And my first element is done and dusted - beautiful, 3D butterflies to zuss up any pressie. That is if  I still have any left by then - you can see the first one already hopped onto my diary to brighten my wintry day. Want to see what they look like when flapped up?


I do like them a lot and it wasn't even my own idea!  A friend bought me a pack of these beauties at Typo (they cost a fortune!!) and out came my "idea book" - it took me less than a day to do some of my own. Next week when we are doing the scraps, I'll show you exactly how it works.

Have you figured out what my new toy is?  Well, I'll tell you tomorrow.  So this is the last day that you can leave a comment and guess. One person will receive some Sunshine from Sunny SA delivered to his / her address. OK, a clue - her name is Hette.

It is a long weekend in Sunny SA - my husband is away on business and all my scraps are on my dining room table.  I'm off to get them sorted.  Thanks for looking at my blog today and please come back to play as I have a lot more crafting fun to share with you right here on Play as U Go.

Have a wonderful day!


Wednesday, August 7, 2013

Playing with Glasses

Hi there Bloglanders

I'm still playing. Want to join in the fun??  Let me show you what I did today:


While sorting the stuff left after both the boys moved out, I came upon a box of glasses.  As I've got beautiful flowers in my garden, I decided to convert a few into vases.  No glass etching for me - I try to use all the left overs from previous projects first. So, left over white spray paint from Wernich's architectural models - ta da!!


The starry template is from the Write.click.scrapbook blog. Just click here if you would like to get it for free and the circles are from here. Have you guessed what I got for my B-Day yet?  Never in my wildest dreams did I think I would have so much fun!!

So, keep guessing and if you leave a comment, you can win a bit of sunshine from Sunny SA. Remember to let me know where I can get hold of you.

I'm off to some more crafting fun.  Oh, first I have to clean the kitchen.  I love doing dishes with these "vases"  and flowers on my kitchen windowsill. Thanks for visiting my blog and please come back to play.

Tuesday, August 6, 2013

Playing with my B-Day pressie

Hi there Bloglanders

I did tell you that I splurged out on an early birthday pressie for myself and I've been gathering courage to take her out of the box and get going.  Well, I did it and here is one of my first attempts:


Inside this little box is a stack of journaling cards - you can just add a photo and tell the story.  I know, I know!!! You get them everywhere in the shops BUT mine is different.  I'm Afrikaans and most of my friends and family are too and as we don't get ANY journaling cards in Afrikaans, I designed my own.  I totally love them and it looks as if the rest of Sunny SA does as well.  So, this is my first batch leaving. Once the recipient has opened it up, I'll share my cards as well.

In the meantime, can you guess what my B-Day pressie is?  Leave me a comment and a contact email and you can win a little love from Sunny SA delivered to your address.

That's it. I'm off to do some more crafting.  Thanks for looking at my blog and please come back to play as I have lots more to share right here. Have a Terrific Tuesday!

Monday, August 5, 2013

Friends Mini Book

Good morning Bloglanders

Over the weekend I sorted through some of my mini books from the past. Actually, I made a voucher book for my husband for his previous birthday and he actually wanted to use them and couldn't find it.  Now he blames me for "stealing" it back!!! But, I'm sad to say, I did put an expiry date on all the vouchers and therefore, "if you snooze, you lose BIG TIME!".  Anyway, I came upon this mini book and out came my camera.

It's Afrikaans (My Maats) and means "my friends" .  I hosted a 7th birthday party for my friend's DD - Alexa and all her guests had to make mini books with pictures of their friends. Don't you think it would be fun if you are 50 years old and you can still look at pictures of your friends when you were 7?  

I'm sure it will be as I made this a year ago and it was fun when I looked at mine. Here is one of the inside pages:

We recycled office paper for the pages and used scraps for the embellishments. I stitched through the pages to keep them together, rounded the corners and the BIGGEST fun for them was the twine with the little stars for the back of the book. (See picture 1)

I even added a little glassine bag to the back to keep all their goodies together:

It was fun, kept them busy for a whole afternoon and as I said - a wonderful souvenir. Best part was that we didn't even need goody bags as this was more than enough to take with.  

That's it!  I'm going back to looking for that stolen voucher book - maybe there will be more gems lurking in my archives. Tell you all about it tomorrow!  Thanks for looking at my blog today and please come back to play.