Monday, September 30, 2013

Nail varnish embellishments for Layout

Good morning Bloglanders

I hope you had a wonderful weekend.  Wynand is back from Vietnam, Wernich is back in Bloemfontein and Pieter's classes resume today so it's back to business for us. I did have a little crafting time and this is what I did:

Can you see the splatters in my layout?? I don't buy mists and inks so I used ordinary nail varnish for my dots and it worked very well.  Just another way of using what you've got without breaking the bank!

And my inspiration came from My Mind's Eye's challenge for September:


I you want to see what the rest of  Blogland did with the same sketch - just click here.

I'm off to get the office admin sorted and making a dress for a friend's daughter.  More than enough to keep me busy for the day and of course, I plan to sneak in some crafting fun as well. Thanks for looking at my blog today.  Have a Marvellous Monday and please come back to play.

Hazel

Thursday, September 26, 2013

Meet the BOO Babes.

Good morning Bloglanders

I hope you are well.  Today I brought my Halloween treat bags to show:

We don't do Halloween down under in Sunny SA but I love these celebrations and always try to make little treats to give away to children, family and friends.  Normally I string all the treat bags and hang it above our fireplace.  As the occasion draws nearer, I start giving / mailing away and the last few get delivered to the mailboxes on the actual day - normally the children in my neighborhood.

This year I decided to make a BOO family. In my picture you can see the little girl and boy. BOO Mum and  Dad is still in the making and so are all the nephews, nieces, uncles and aunts.  When they are done, I'll show my fireplace bunting.

And my inspiration .................................... came from the Silhouette blog's free cut file of the week. It actually began more than a week ago with a challenge. Yes, you know how I feel about that!  The challenge was to use words from the Silhouette shop in a project but as I'm Afrikaans, I don't buy English sentiments. Big Surprise when I downloaded the free Halloween shapes ........................ it included the ghost, a speech bubble and a BOO! Well, BOO is BOO - even in Afrikaans. I just love it when a plan comes together.

For the ghosts I've used tracing paper left behind from my architect son's projects.  I sized the ghost (mum is bigger and dag the biggest) and then did an internal offset in a perforated cut.  I used top stitching to sew 2 shapes together through the little perforated holes. It really works!  I added a little bow for the BOO girl and a tie for my BOO Boy. And a BOO banner - mounted on a toothpick.

I love the little BOO family.  Do you still remember the "Bag of worms" I did last year?  If BOO Babes are not your thing, check this post out here. And for the ones that don't like the "click here" - a pic!!


Whether you are a BOO person or a wiggly worm - I'm sure your treats would be adorned all round - especially if you use scraps on hand and it doesn't cost a thing. Oh, wanna know what's inside the BOO Babes?? Ghost poo!!

That's it. Thanks for looking at my blog today. Please come back to play as I have lots more to share with you right here.

Hazel

Wednesday, September 25, 2013

Mini Heart Love Letters

Hi Bloglanders.

Once again - a beautiful day in Sunny SA!!  For my fellow South African Bloglanders - I hope you had a wonderful "braai day". Today I just want to be outside so I've got a quickie to share:
Sometimes when you see something in Blogland and you just can't help yourself. You have to try it.  And this was it. I saw it on the Silhouette blog and couldn't wait. It was actually their freebie so I didn't even have to spend a dime for the fun. Just click here to see for yourself. 

I had to copy and paste it for you - I know that a lot of my Bloglanders hates the links.  I'm not sure if I'm allowed to reblog something like this but I couldn't find copyright procedures so I took the chance. If anyone has a problem, email me and I'll remove the image.

And for the non electronic Bloglanders, I also found instructions for the envelope on Pinterest:
Here is the link to the post that shows you how. The original post is from Forty Weeks. You can make the same one by hand but oh boy .............................. my Silhouette is worth every penny I spent on her!

That's it. Sometimes you just have to try it!! Go ahead and tell someone you love him / her right now. Thanks for looking at my blog today, I'm off to work in my garden and will be back tomorrow with some more crafting fun. Have a great day!

Hazel


Tuesday, September 24, 2013

A4 Mini book ...................... let's call it part 2.

Good morning Bloglanders.

It's a public holiday and our proclaimed "Braai Day" so I'm putting my post up early because I want to join the boys and their girls for brunch / lunch and dinner outside.


Today I'm sharing a mini book for MY LIFE, MY WAY album. (Project Life) Here it is:

And inside it looks like this:
Remember when I showed you how to make this mini out of one A4 sheet of paper?
If you missed it, just click here

And there I was ............................ thinking that I was the brightest person in Blogland coming up with this. But as my friend Monika once said ................................ nothing's new. So I hopped over to Pinterest and what did I find?????


This one by Jessica Sprague using Basic Grey digital products:


Yes!!! the one I tried out for today's post! I just altered mine to be Afrikaans.  Jessica has a free download. over at her blog. And there's more ........................ a video tutorial of how to make it and step by step pics of how to fold your book. She even mentioned that the idea came from a book called How to Make Books by Esther K. Smith.  Here is the link to Jessica's post.

And I also found this one on Pinterest:


What I love about this one by the adventures of bluegirlxo is that she makes it out of paper, add all her embellishments and text and then have it copied onto A5.  This results in a very small book and she sends them to all her friends.  What a great idea to do - then you can just fill one out when someone has a birthday and you only have to make one version each year. This is going to be the way to go for me for 2014.

If you make it slightly smaller than 3x4 it fits perfectly in a Project Life page protector. If it's bigger, you can add it to a layout - great way to include 10 more pictures! I've printed mine on a slightly thicker copy paper and it is very sturdy - just think how great it would be as a photo card for a grandparent!

This is a rather long post but I thought as we are having a day off, I'll bring some extra eye candy. Thanks for looking at my blog. I'm off to sit outside and chat to the children, drink wine and enjoy a South African "braai". For the record ........................ Wynand is in Vietnam on business and is missing out on all the fun. I'll send some pics over to him so that he feels included. Have a great day and please come back to play.

Hazel


Monday, September 23, 2013

I sew with Twine

Good morning Bloglanders

I hope you had a wonderful weekend.  We have wonderful weather - not hot, not cold and tomorrow is Heritage Day in Sunny SA - our proclaimed "braai" day.  All of us will be outside enjoying the beautiful weather, family, friends and a good old "braai". (= barbecue)

For today's project I started out with something entirely different and then got round to doing this:

It's a teeny, weeny sewing pouch. (measures less than 2 x 3) I always have a needle and thread on hand so I decided I can just as well pretty my goodies up.  You will always see me on a camping trip mending something for someone - from flip flops to pants and I even have a picture of Chandre's dad at her sister's wedding - me sewing on the button of the "father of the bride's" shirt before he could walk her down the aisle! Don't believe me?? I've got the proof:

And a peek inside:

And this is where my inspiration came from:


I have ordered heat transfer from Silhouette and when it arrives, I plan to do mini sewing kits for my BBF's for Christmas. Even the sentiment is ready: "Thank you SEW much for being my Friend". Of course I'll show once it's done - I know you can't wait to see.

I'm hopping over to The Twinery to enter my mini sewing kit. Want to join in the fun?? Just click here. Thanks for looking at my blog today and please come back to play as I have lots more to share right here. Have a Marvellous Monday!

Hazel


Friday, September 20, 2013

Mini Album with Big Picture Classes

Hi  there Bloglanders

I was sorting through my crafting projects looking for new ideas and inspiration when I came upon this little gem:


I actually made this in 2011 well before I became a Bloglander - it was part of a series done by Big Picture classes. I think it was free and you received a prompt from a different designer for 10 consecutive days and had to portray your take on it.  I really enjoyed it and now I have this mini book to show off.  

Here are my pics of the front and back of my book:

It is a post bound album and I've covered it in vintage fabric. On the front I've got all the words that were part of the prompts.  I made the artwork myself, flipped it,  printed onto heat transfer paper and ironed it onto natural canvas.

And  here is one of the inside pages:


Next week I'll show the rest.  This was my first attempt at Photoshop and I actually used photos for my background - just downed the transparency. On the right I added a quote and to the left I translated the prompt into Afrikaans, French and German (and of course the original - English).

I kept the layout standard through the whole album which saved on time and made the feeling more cohesive. Even 2 years later, I love the look and couldn't believe how well I fared as a PS novice.  

That's it. I'm slip covering my living room chairs this weekend and want to get the cutting done this afternoon. Yes, I will show once it's done. And I'll be back to show the rest of this "Words I live by" mini book next week. Thanks for looking at my blog today and keep safe until we meet again.

Hazel


Thursday, September 19, 2013

Work space inside info.

Hi there Bloglanders.

Earlier this week I shared a layout made for MME's Labor day challenge. If you missed it, just click here or scroll 2 posts down. I didn't even think about it when I posted the layout but you can't really see my pictures. So ....................................... I received emails to ask me to show better ones and explain .........................
and here they are:

On the right is my Craft Closet. Most of my regular Bloglanders have seen this but if you missed out - there is a link on the right that says "THE CRAFT CLOSET" and you can read all about it there. Most of my crafting gets done here but I am IMPERFECT ME so I do travel all over the house with my supplies if the fancy takes me - especially if the whole family is at home - you will find me at our dinner table, happily crafting on without missing out on the action / conversations.

On the left is my "real office". I work from home and share this one with my husband.  The layout and decor was mostly his idea. Can you guess which items I have added?  The red medical tin and the red chair!! We have blinds on the shelving unit (another minimalistic idea from Wynand) and if we see clients, it gets pulled down and everything is neat and out of sight.  Works really well even though it's a bit clinical for IMPERFECT ME.

And now for my fave:

We have a HUGE open plan living area and this space if just off everything. I work from here 99.9% of the time.  I can see the office (in front, door to the right); to the left if the sitting room and dining room and back the kitchen and laundry.  You can see my handbag hanging on the chair - both the boys say they are always looking for it when they come in and immediately know whether I'm home or not.

There is also a TV, some cozy chairs, lots and lots of shelving (this time I chose the bamboo blinds to hide the ugly) and a door to my stoep (porch). My whole life (and Wynand and the children's) gets managed from here - HQ Hamman.

I can hear and see just about everything from here - the stove, the washing machine, the back door, the front garden, the entry gate and both the access gates to our property. I can even hear the alarm which squeaks every time somebody moves outside our home.

Anything else you want to know??? Send me an email or leave a comment.  I will gladly explain the life of IMPERFECT ME.

That's it! I'm off to work on my PL pages.  With all the children on holiday, I have heaps of pics to file away. Thanks for looking at my blog and please come back to play.  I have lots more to share right here. Have a Terrific Tuesday!

Hazel


Wednesday, September 18, 2013

1 x A4 page Mini Book

Good morning Bloglanders

I hope you are having a Wacky Wednesday!!  As promised, I'm here to share my mini book made out of 1 sheet of paper. Want to see?
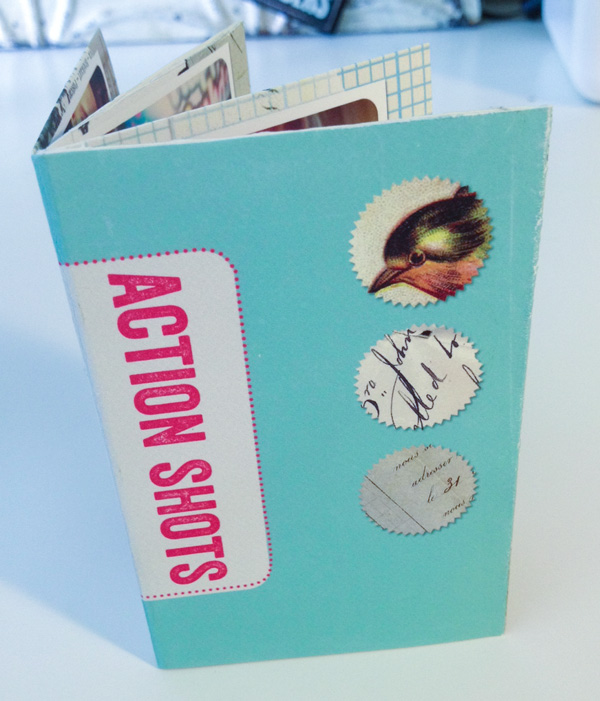
And some more eye candy:


For my non Afrikaans speaking Bloganders - SOMER = SUMMER. Remember down  under in Sunny SA we have half the summer at the beginning of the year and the rest at the end.  That's why it's called Sunny SA - 2 summers in 1 year!!

Want to know what I did?


1. Print and trim the edges off your printable. Mine is 5 and 3/4 x 11 and 1/4 inches. Funny size but I work in cm. (If you want to do your own: The width must be double the length you want your book to be and the length X4 the with of the finished book.)
Add your titles and / journaling. (I pre printed mine)
2. Fold in half long side. Unfold.
3. Fold in half short side. Unfold.
4. Turn over and fold edges towards middle fold. Shot side.
5&6. Add pictures, journaling, embellishments, etc. I did some sewing and added cut outs and staples.
7. This is the only tricky part. Fold in half again and cut to the middle on the closed side.
8. Open up the cut and fold pages onto one another.
9. If you fold it like a star and then flatten it out with the front page on top.

I have glued some of the pages on the inside but where the book made pockets on top and the side, I just inserted some more tags for journaling. You can see them peeking out in my main pics.

Done in less than 15 minutes.  I did another one with everything printed in advance - pictures, journaling and embellishments. It doesn't look as good as this dimensional one but it folds flatter and would fit perfectly into my PL album.  If I get it into my album over the weekend, I'll take pics and share.

For those of you who want to try, I'll try to share my PDF. Please bear with me as this is my first attempt of sharing.  This is what it looks like and just click here for the download link.


This would be perfect to do for party favors or as a DIY activity during a child / teen / stork / kitchen tea party. You can even make it into a mini recipe book. Or a Christmas card for the grandparents.  I'm using this one for my Princess's kitchen tea!

I did all my cut-outs with my Silhouette and while at it, I did some titles for my PL pages. Remember that is why I bought HETTE - to add titles directly to my pictures and save time and money.  I'm rather proud of this one - welding at it's best:


Don't you just love the little heart that I've added?? If you want to try "welding" - just click here - an easy tutorial over at the Silhouette blog.

That's it from me. I have office work to do today but I'll be back to show my finished "snow in Sunny SA" page tomorrow. Have a great day and thanks for visiting my blog.

Hazel


Tuesday, September 17, 2013

Labor Day Layout with MME

Good morning Bloglanders

I'm well and for those of you sending me messages about the Princess's accident - thank you so much.  She is bruised and sore but otherwise fine.

Today I'm showing a layout for the MME Labor day challenge.  My American Bloglanders just celebrated Labor day but in Sunny SA we do it in May and for me working from home ............................. well, I just go on as usual.  So I made a layout about being thankful that I can work from home and have time to play as well. Here it is:
It's a mix and match of MME papers from different ranges but that's the thing about their stuff - you can use very, very old scraps with brand new ones and they fit like a glove.

My layout also portrays that I work in the office, in my craft room AND from a table in the middle of our open plan living room. This is my fave spot. I can see and hear everything ................................ from the washing machine, dinner on the stove to the pot of spring flowers on my "stoep". These days people live in really small flats up in the sky and I'm sure they are content but I'm SO thankful for my home, garden and the rural area I live in. To top it all .............................. Sunny SA has the most wonderful weather ..................
nothing like fun in the sun.

Talking about fun in the sun ............................. tomorrow I'll be showing a mini book made out of just one sheet of paper AND I'll be fitting it into my Project Life. Hope to see you tomorrow and thanks for looking at my blog today. Have a Terrific Tuesday!

Hazel

Monday, September 16, 2013

Mini in the Making - 50 Things about ME.

Good morning Bloglanders

I hope you are well and had a wonderful weekend. We had a HUGE scare - a drunk driver drove into Pieter's girlfriend and her car is a total wreck. Except for a LOT of bruises, our Princess is fine. Worse part is that she was in a similar accident about a month ago and this was her brand new car. Only 1000 kilometers on the clock. Here is a picture ............................ see what I mean?


I did get some crafting done. Here is my mini in the making:


These will become my mini's front and back pages. I haven't decided yet.  My idea is to write down 50 things that most people might not know about me.  OK, I'll tell you one ........................... I just love chili sauce ......................... not any chilly sauce ........................ the Tabasco Chipotle one.  And another  ....................... I kick off my shoes anywhere / everywhere / all the time.  For as long as I can remember I've been doing this. Weird, isn't it?  IMPERFECT ME. I'm sure you have things like these and if you have, why not join me with a "mini in the making"?

This is what I do. I've pre printed journaling cards from the Becky Higgins Flea Market set.  I do love them.

When I get the time, I write something down, cut it to size and it goes onto an old Creative Memories journaling card. I've got stacks of these from when CM first left Sunny SA and all the stock was sold at huge discount prices. The journaling cards will just give that bit of extra dimension and sturdiness to my mini. Here is my stack:

And these have been done:


For my non South African Bloglanders. I don't sew on a Sunday. (no reason for that but I don't) and my fave flowers are Daffodils for the garden and Freesias for the vase.

Now back to my covers. I used 4 pieces of 4x6 cardstock scraps from my stash to die cut into my title and different shapes. With my Silhouette it took a few minutes and I have heaps of shapes.  I'll take a pic and show just how many you can get from just one 12 x 12 sheet. My Silhouette has a brand new cutting mat so I just added my different paper pieces and only did one cut.  You just have to keep in mind that you have different pieces of paper when you do your layout in Silhouette Studio. Even for a Dummy like me it was easy peasy.

I have done front and back cover pages - as I had all the negative shapes left after my front was done, I decided to use them on another page.  Now I can't decide which one I like best. The original or the negative side.  No need to choose, I'll just use both.

That's it from me. I'm off to write something in my "mini in the making" - just remembered that I don't like condensed milk. Thanks for looking at my blog today. Please check back as I have lots more to share. Have a Marvellous Monday!

Hazel

PS. Just remembered .......................... another one for my book. I don't "re read" my blog posts for mistakes / alterations. For this one I've got a reason -  If I do  I'll never publish it because I'll start re writing and doubting everything so I just hit the "Publish" button once I'm done.

Friday, September 13, 2013

Kammieskroon Layout.

Hi there Bloglanders.

Happy Friday the 13th!  I hope you are not superstitious and if you are .......................... rather stay in bed or maybe not ................... stats show that most people actually die in bed. (This sounds awful to a sleepyhead like me, but you get my drift ................)

Today I have a layout to share.  Oh, I can hear your sigh!! I know you love my hybrid posts but I just don't get page views for my layouts.  So today, I brought a bit of info to share - maybe that would interest you. (and get my views up)  First my layout:


I grew up on a farm in Namakwaland.  It's a very dry, rural area roughly  400-800 kilometres north of Cape Town.  Most of the time it is dry, dry, dry with almost nothing in sight but during spring it is colored in all the shades of the rainbow. Hundreds of wild flowers spring up from nowhere. This doesn't even happen every year. If the winter rains doesn't come early / late / enough - no flowers!!

Wynand and I took these pictures during a trip in 2011 near Kammieskroon.  To give you an idea of the size of the town, I asked my friend Google what the population is. 893!!!!!! I can tell you this - if there were wineries in Kammieskroon, that would be the place for me. Now you know that not a lot of people live in Namakwaland but a fun fact that I stumbled upon as well is that 95% of the residents speak Afrikaans.  You see why I'm immigrating to Kammieskroon? (Hope they have internet access to enable you to tag along.)

I'm off to work on my PL. Yeah, know you don't like that either BUT I'll be back and this time I promise ........................... some more hybrid crafting for you.  Thanks for looking at my blog today and please check back as I have loads more to share right here.

Have a great weekend!
Hazel

Thursday, September 12, 2013

Fall??????

Good morning Bloglanders.

Today I'm showing my "fall" project.  Now, in Sunny SA it's a beautiful spring day and my Fall mini book has been sitting on my coffee table for the past 6 months. Done and dusted.  So, this is what I did for the challenge:
I used a kit from Monika's "iLoveitall" Etsy shop to do my mini but I don't have ANYTHING left of the goodies she sent me so I decided to get going on embellishments for my 2014 fall mini. And you can see - they are perfect!! Colorful, dimensional and cheerful.
My artwork is from Silhouette and once again I did "print and cut" with an additional layer for the back done with the "offset" option. In between the layers are pop dots and I've put some at the back and attached it to transparency sheets left behind from my architecture postgraduate. Now I can just peel and stick when the leaves start to fall.  In the meantime, it's flowers, birds and bees all round.

If you missed the post where I did my first dimensional embellishments, you can click here to check it out. When I did them, I had to convert my images to Silhouette "cut-ables" but for today - I just had to hit the cut button. So easy when you work with Silhouette. Enjoy!

I'm off to get some admin done and then I'll be outdoors ........................ enjoying my spring flowers and the beautiful day. Thanks for visiting my blog today. Have a Thunderous Thursday.

Hazel

Wednesday, September 11, 2013

Sew with Twine.

Good morning Bloglanders.

Once again, I'm having a wonderful blogging month ............................ all thanks to you checking out my posts!! To tell you the truth, a lot of times you wonder if anyone out there are reading your posts and then you have a month like this and you know it's worthwhile.

I'm a rather sensitive soul and get depressed quite easily.  When my cat died last year, I just wanted to stay in bed and cry but when I checked my email .............................. there were lots of  Blogland friends letting me know that they care and miss me. It got me right back into thinking up creative ideas to share with you.

Today, I'm sharing a project I made for The Twinery's challenge:

When I saw their inspiration, I thought - this one is not for me but over the weekend I saw that my BF Marelize's DD's (she's got 3) have their names on their pillowcases. You know kids travel with their pillows to snooze during the trip???? I only have white pillowcases and it it always a mission to get the right pillow to the right person. You can even spoil Wynand's day if his pillow accidently gets mixed up with the rest. Have a look at The Twinery's inspiration:


I think I'm the only Bloglander thinking of sewing the minute I see Twine!! Anyway, it doesn't matter - just looking at Twine inspires me. And as close-up:
For my "sewing with Twine" I've used Blossom, Pink Sorbet and Solid Pink Sorbet. The solid colors really works very well for sewing, knitting and crochet.  Just goes to show - you don't have to use your twine only for wrapping pressies. You don't have to do pillowcases - bags for shoes or laundry will work just as good - I always put my coat in a bag behind the seat when we go on holiday. Then, if it gets cold, out it comes and I don't have to unpack my whole suitcase - nice, tidy and clean as well.

That's it. I'm doing one for myself in my fave color - purple.  Have a great day and thanks for looking at my blog today. Please check back as I have lots more to share right here.

Hazel

PS. Marelize's youngest daughter is Alexa - lucky me ........ getting inspiration and a "X" from the same source!!

Tuesday, September 10, 2013

Working with scraps.

Hallo Bloglanders.

A few weeks ago I told you that I'm sorting through my scrap stash to convert it into more manageable piles. Well, it's done.  This is how it works.  I keep all my scraps in a wooden crate on one of my "crates converted to trolleys" and once a year I sort everything. These are my "before" and "after" pics:


On the left: all the scraps in the wooden crate and on the right: neatly sorted into plastic tubs that fit into each other.  I'll be doing labels but that's a project for another day. Watch this space! When the tubs are apart, they look like this:


6 Tubs: Top from left to right:
1. I keep all 6x6, 6x4 and 3x4 pieces as they are as I use them for mini books and to cut with my Silhouette.
2. I love negative shapes and keep all the usable ones.
3. Pieces that can be used for tabs, shapes, or negative shapes. I cut them as needed / when I have time.
4. Strips: I cut them into boarders as needed.
Bottom from left to right:
5. Recycled gift wrap to be reincarnated in future packaging projects.
6. I  keep all white and cream apart from the rest - I like to stamp on a separate piece of paper, die cut and then use the sentiment.  The world's worst stamper - IMPERFECT ME!
And in the cupcake tin: all my most popular die cut shapes.  I use them all over the show - packaging, in my "smash" books, on Layouts, in my dairy.  They are like little gems to me.

And to prove my point: Washi party favors for my friends:


And in my diary:

That's it.  My stash sorted for another year.  I hope I've given you some ideas - the best is to do what suits your needs but my system works like a charm. Best part is that I always have goodies to give away as gifts and to pretty up a pressie.

Thanks for looking at my blog today. Please check back as I'll be sharing some more crafting fun right here. Have a wonderful day!

Hazel


Monday, September 9, 2013

My 2013 Diary.

Hallo Bloglanders.

I'm back at home with lots and lots and lots of  laundry. Admin up to the roof and errands to run. Still, the getaway was great but it's even greater to be back home in my own bed. To top it all - it is a beautiful, sunny day in Sunny SA!

Today I'm sharing my 2013 dairy.  Can you believe that we only have three and a half months left of 2013? Before I start on 2014 version, I took pics to show the current one.  Here we go: The closed-up version.


And in action:


And the front and back cover pages:

I use monthly journaling cards to keep track of all the month's activities. It's from Monika Wright's "iLoveitall" Etsy shop and she graciously adapted the size for me to fit my shop bought diary pages.

Here is a sneak peak of the inside:
You can see that I buy A6 refill diary pages, add the monthly journaling cards and then everything is "Zuttered" together.  This works very well for me as I fold the book back with just the day's page open.  I keep in together with some elastic finished off with a felt butterfly and button.

For the covers I've used cream fabric, a bit of fabric dye sprayed on, die cut letters and some stamping. Sewn around the edges and it's done.

Now I will have to start thinking about an idea for 2014. The inside will definitely stay the same - the size and format works for me but I like to try something new every year for the covers. Watch this space!

That's if from me. I'm off to get all my chores done. Have a great day and thanks for hopping onto my blog today.

Hazel


Friday, September 6, 2013

Unexpected storage @ Craft Storage Ideas

Hi Bloglanders

I'm still sitting on the "stoep", drinking wine and eating seafood. What's more - I have to post from the iPad. Suppose it's better than nothing but I'm not used to is and it's taking ages!

Therefore, I'll just remind you that I'm over at Craft Storage Ideas with ideas for unexpected storage.  Can anyone have enough? Well, I had a look around Blogland for ideas and you can see what  I came up with here.


1/2/3/4

Back to doing sea, sun and sunshine for me!


See you next week when I'll be back home and crafting up a storm. Enjoy your weekend!

Hazel


Thursday, September 5, 2013

Project Life with Transparency

Hi there Bloglanders.

Still at the beach and loving it!  I hop you are having a Thunderous Thursday. Yesterday I told you that I did some more printing and cutting with transparency while all the tools were out.  Today I'm sharing a Project Life page that I did some time ago.
For me Project Life is all about the pictures and I felt fine with these of my son's engagement and the Princess's birthday. At least it was in an album and not floating around cyber space. (most of them came from Facebook ex the children and their friends).

Then I tried the "print and cut" option on transparency and got these gorgeous arrows.  Perfect to zuss up the page and while at it ...................................... I did the titles on my Silhouette as well.  For my non SA Bloglanders: "verjaar" = to celebrate your birthday; "verlief" = in love; "verloof" = to get engaged.  Now you know!

That's it.  We are having friends over for the weekend so I have to do some shopping, cooking and cleaning.  I'm off to get it done ....................... still want to fit in some crafting fun.  Thanks for looking at my blog today.  Please check back as I have lots more to share with you right here.

Hazel